In the time I have been perfecting my crochet craft, I have learned that mistakes come with the territory. More than once I have gone around the block to cross the street. If I’m honest, some of the tips below have only recently crossed my path, for which I am eternally grateful. I’m sharing today in an effort to save you from yourselves = crocheting along with some deeply ingrained habits that aren’t really serving you. I hope, in some small way, these come in handy and save you some time, effort and gray hairs.
Tip #1 – How to find the center END of a Red Heart Skein
Seriously, if I counted up how many hours I have spent trying to find the end of a skein of yarn, I would have enough time to go on vacation, have a couple of kids and get a hip replaced! And I’m not talking about that end that teases us from the outside of the skein. You know – the one that says “I’m right here, just start with me!” NO – Don’t do that! Nobody has a yarn bowl that big! Who wants to get all comfy on the couch, in front of your latest Netflix obsession, just to get up and go chasing that dumb skein halfway across the living room?
No, you must begin from the center and if you must begin from the center then you have to know the trick. Apparently Red Heart feels our pain (or has had enough phone calls into customer service to do something about it). Red Heart has this handy pull indicator on their skeins (not on balls, though-I’ll continue my phone call campaign right after I finish this post) that tells you which side to pull the middle end from!
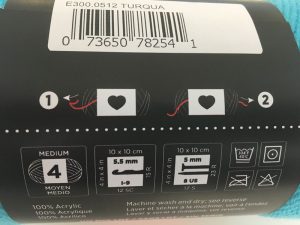
WOW! Pretty simple huh. You can checkout the Red Heart blog post on this very tip here. Now, if you’re like me and go into that side of the skein all gang busters and pull that yarn until your neck muscles distort, you’ll get a big ball of yarn barf – otherwise known as a baby skein, big mess, not what you wanted. If that happens, see tip #2
Tip #2: How to make a center pull ball from a hank of hand dyed yarn (or if you made a wretched mess of your nicely wound skein)
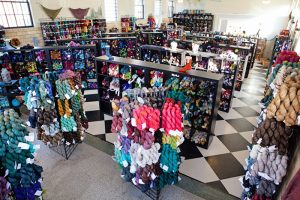
Today, there are five hundred gazillion independent, mostly magnificent, hand painting artists making Las Vegas buffet worthy hanks of yummy yarn.
Simply Socks Yarn Company
These are fantastic, but if you’re not in the market to buy a yarn swift to neatly unwind that yarn while you’re working with it, or a hand crank winder to put it into a nice center pull ball, you could end up with a mess (like I do when I get impatient). Here’s a nifty way to wind that yarn into a center pull yarn ball without spending more money on wooden and plastic contraptions.
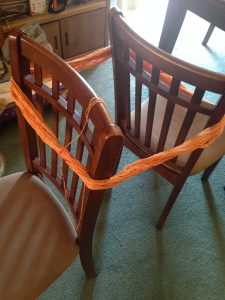
First, you’ll need a way to hold onto that hank. It will usually come in a nice, rather large, loop. You can use anything really to hold that loop in place – the legs of a kitchen chair (flip that puppy over and loop your yarn around the legs), the large back of a recliner (unfortunately you’ll have to exit the recliner for a minute, but you’ll be back in front of Netflix in no time), a friend (that’s right – hold those arms out in front of you until your biceps burn like an over heated steam kettle), I’ve even been known to sit criss-cross, applesauce (what, I have kids) and loop the hank around my knees. Here I just looped it around the backs of two kitchen chairs.
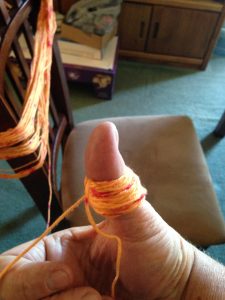
Once you have your hand looped somewhere so that it doesn’t fold in on itself, grab an end and hold your thumb up like you’re hitchhiking across the country. Leaving a generous “tail”, hold the end of the yarn at the top of your thumb and start wrapping the rest of the yarn around your thumb in a ball-ish manner. Please wrap it loosely. I’m not sure, but I think they will laugh at you in the ER if you show up with a yarn winding thumb injury. Don’t drop the tail. That’s the piece you’ll pull from. Keep wrapping the yarn around your thumb until you’ve made it through the hank and voila! A center pull ball. Here’s another technique from Lion Brand – clever but not nearly as fun.
Tip #3: How to join yarn so you have no ends
HA. That can’t be right. Where the heck to the ends go off to? That’s what I thought but leave it to the Russians to figure this one out.
There is a way to join yarn to itself without using a knot, a hair tie, or Elmer’s glue AND you can hide those ends and never see them again. Since I learned this technique it’s the only one I use (read the picture left to right, top to bottom).
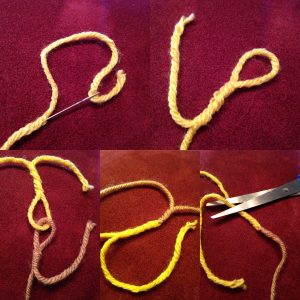
You’ll need a tapestry needle and some scissors. Thread strand #1 onto your needle, make a loop and plunge that needle back into the yarn from that strand. You’ll be able to see how the ply of the yarn will separate if you twist it a little (this works best on multi stranded yarn). Move the tapestry needle down the yarn as far as you feel comfortable while keeping an open loop. Remove your needle and leave the tail accessible (you’ll need it in a minute). Thread strand #2 onto your needle and thread it through the loop you left on strand #1. Repeat the process of plunging that needle back into the yarn from strand #2 as far as you’d like. Just make sure you’re getting through the “middle” of the yarn with your needle. Remove the tapestry needle and pull those loops closed. You’ll end up with a slightly thicker yarn in this area, but from my experience, it hides fairly well in most projects. Once you have everything closed up you’ll have two tails left – but wait, I told you there weren’t going to be any ends! Just snip them off (that’s why you need the scissors) right where they exit the yarn. Here’s a great video tutorial on the Russian Join from All Free Crochet if you need that sort of thing.
Tip #4: How to change colors without knots
When I was younger (before I got all good at it) and I wanted to change colors in crochet, I would do one of two things. Either finish the row (mostly I was crocheting Granny Squares so that was pretty easy) and start a new row with a new color or tie a knot. The knot tying thing didn’t usually work because I wasn’t a good judge of how much of one color I needed before I placed the knot.
Then I got all ambitious and decided to make 9 (NINE) tapestry crochet blankets over a course of a year. To be fair, making anything out of tapestry crochet can seem pretty simple. After all, it’s all just single crochet (not that C2C expert level, think with your head, stuff). Not so easy, my friends. First I had to figure out the pattern (saving this for another post – content, I need content). Then when I got to that first color change, I thought there has to be a better way.
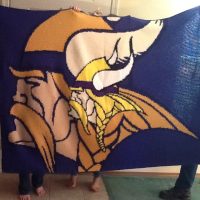
One of the 9 – I’m a Kansas City Fan :O
Indeed, less than 30 minutes on Google University and I had my answer. You won’t believe how simple it is (again, read this picture left to right, top to bottom).
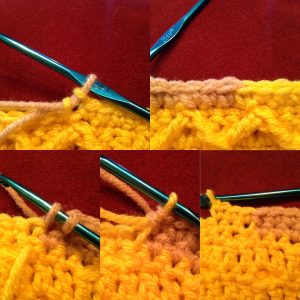
To change colors in the middle of a row (this works for single, double, even triple crochet-this explanation covers single crochet), simply place your hook through the hole and draw up a loop in the last stitch of the old color. Then, with two loops on the hook, loop your new color on the hook and draw through those two hoops. Now continue to crochet with the new color. Here’s the extension – what happens to the old color? Let it hang. In tapestry crochet, you’ll likely pick it up on the return pass. When you get to that point you’ll do the same thing. Draw up two hoops on your hook of the old color and pick up the new color from where you left it. Don’t worry if you’re a couple of stitches ahead or behind where you let that old color hang. Just crochet over it until you get it to where you need it. And make sure you keep a steady tension between the colors. Nobody likes excessively holy fabric (wholey?, wholy., you know what I mean).
A fantastic video by the Craftsy demonstrating this technique can be found here.
Tip #5: How to weave in ends so they won’t fall out
Ah the ends. Lovely little scraps of extra yarn created when you change colors or join squares or for no reason at all – they just appear (the worst). If you’re a God fearing, upstanding, outstanding member of your local Extension Homemaker Club, even you will have dropped a couple of expletives after having sewn together 150 squares to make an afghan and realized you weren’t finished yet! Damn ends.
I did this once – crocheted a beautiful piecemeal afghan only to have it fall apart the first time it hit the tumble cycle in the dryer. No more I said. There has to be a better way! Hello Google, my friend.
It’s simple. Ends worked in a linear manner will fall out. Just happens. Therefore the best thing to do when working in ends, is to work them back and forth two to three times. This gives the yarn more structure and keeps it from wanting to pull out when the fabric is stretched or handled.
But to make this happen, you have to be a little proactive. A one inch strand of yarn end to work in will NOT be easy to deal with and will most certainly wind up as a nice little yarn flag waving at your every time you look in its direction (don’t even think of taking a knee here). Make sure when you are transitioning from one yarn to another (even if it’s the same color) that you leave enough of a tail to work in properly later.
I have absolutely NO IDEA how to make it go faster. I usually just throw that puppy on the living room floor and turn on (you guessed it) my Netflix and go to town. Don’t forget the wine (if you’re into that kind of thing)
That’s it.
That’s the five tips that keep my Crojo going. I hope you find this useful. If you want to receive updates and announcements, don’t forget to sign up below!
Cheers,
Mary